Think beyond.... Make it true...

  • Software Project

    JAVA projects, Dot net projects, web development projects & Andriod projects, android application developing projects

    Read More
  • Electrical Project

    Power electronics projects, drives projects, control system projects, convertors, invertors & power electronics simulation and hardware projects

    Read More
  • Embedded Project

    8051, PIC, ARM, ARM CORTEX, MSP430, & ATMEGA microcontroller projects and RTOS (Real time operating system) projects, embedded linux projects and sensor interfacing projects

    Read More

Thursday, December 5, 2013

Porting ubuntu 13.10 on beagle board xm with GUI

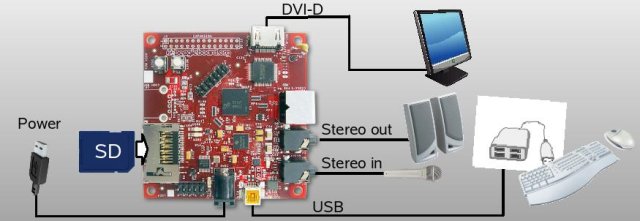
Beagle board with GUI


Get prebuilt image:

wget https://rcn-ee.net/deb/rootfs/saucy/ubuntu-13.10-console-armhf-2013-11-15.tar.xz


Verify image with:

md5sum ubuntu-13.10-console-armhf-2013-11-15.tar.xz

8de42541ee3687d6a167878d4f873481  ubuntu-13.10-console-armhf-2013-11-15.tar.xz

 Unpack image:

 tar xJf ubuntu-13.10-console-armhf-2013-11-15.tar.xz

cd ubuntu-13.10-console-armhf-2013-11-15


 If you don't know the location of your SD card:

sudo ./setup_sdcard.sh --probe-mmc

 You should see something like

Are you sure? I don't see [/dev/idontknow], here is what I do see...

fdisk -l:

Disk /dev/sda: 500.1 GB, 500107862016 bytes <- x86 Root Drive

Disk /dev/sdd: 3957 MB, 3957325824 bytes <- MMC/SD card


lsblk:

NAME   MAJ:MIN RM   SIZE RO TYPE MOUNTPOINT

sda      8:0    0 465.8G  0 disk

├─sda1   8:1    0 446.9G  0 part /  <- x86 Root Partition

├─sda2   8:2    0     1K  0 part

└─sda5   8:5    0  18.9G  0 part [SWAP]

sdd      8:48   1   3.7G  0 disk

├─sdd1   8:49   1    64M  0 part

└─sdd2   8:50   1   3.6G  0 part

    In this example, we can see via mount, /dev/sda1 is the x86 rootfs, therefore /dev/sdd is the other drive in the system, which is the MMC/SD card that was inserted and should be used by ./setup_sdcard.sh...

1.   install image:
2.   Quick install script for "board"
3.   sudo ./setup_sdcard.sh --mmc /dev/sdX --uboot beagle_xm


Quick install script for "board" (using new --dtb option)

sudo ./setup_sdcard.sh --mmc /dev/sdX --dtb dt-beagle-xm

You should now be able to unmount the SD card from you PC, insert into your Board, reboot and have the OS loaded.

For a basic framebuffer driven desktop environment: (make sure network is setup):

Ethernet: "sudo ifconfig -a" and "sudo dhclient usb1" or "sudo dhclient eth0"

Then run:

/bin/sh /boot/uboot/tools/ubuntu/small-lxde-desktop.sh

Select any one of GUI listed below as per your need,

sudo apt-get install ubuntu-desktop

sudo apt-get install xubuntu-desktop

sudo apt-get install lubuntu-desktop

sudo apt-get install kubuntu-desktop

sudo apt-get -y install lxde lxde-core lxde-icon-theme


Keep in mind that lxde is light weight and its most preferable....


for more project info visit,

www.masterychip.com


reference

http://elinux.org/Beagleboard:Installing_LXDE

http://elinux.org/BeagleBoardUbuntu


Thursday, October 3, 2013

Android Call Blocker

About
            This application is block all incoming calls and send automatic busy message caller mobile.  The automatic message based on user can edit or default busy message. 
Specification
1.      Eclipse IDE
2.      Java 1.6
3.      Android SDK for windows package
4.      Android Smart phone(android 2.3.3 minimum)
Steps
            1.The following steps to use for create an android call blocker application

1.      First create a new Android project


12.      Create the following 2 Java class

MainActivity.java


package call.control;
import java.lang.reflect.InvocationTargetException;
import com.android.internal.telephony.ITelephony;
import java.lang.reflect.Method;
import android.app.Activity;
import android.content.BroadcastReceiver;
import android.content.Context;
import android.content.Intent;
import android.content.IntentFilter;
import android.graphics.Color;
import android.os.Bundle;
import android.os.RemoteException;
import android.telephony.PhoneStateListener;
import android.telephony.TelephonyManager;
import android.telephony.gsm.SmsManager;
import android.view.View;
import android.view.View.OnClickListener;
import android.widget.Button;
import android.widget.CompoundButton;
import android.widget.EditText;
import android.widget.Toast;
import android.widget.ToggleButton;
import android.widget.CompoundButton.OnCheckedChangeListener;
public class MainActivity extends Activity{
ToggleButton blockAll_cb;
Button b1,b2;
BroadcastReceiver CallBlocker;
TelephonyManager telephonyManager;
ITelephony telephonyService;
EditText t1;
@Override
public void onCreate(Bundle savedInstanceState) {
super.onCreate(savedInstanceState);
setContentView(R.layout.main);
t1=(EditText)findViewById(R.id.T1);
b1=(Button)findViewById(R.id.b1);
b2=(Button)findViewById(R.id.b2);  
b1.setOnClickListener(new OnClickListener(){
@Override
public void onClick(View arg0) {                     
t1.setText("");
}});
b2.setOnClickListener(new OnClickListener(){
@Override
public void onClick(View arg0) {                     
finish();
}});
initviews();
blockAll_cb.setOnCheckedChangeListener(new OnCheckedChangeListener() {
@Override
public void onCheckedChanged(CompoundButton buttonView, boolean isChecked) {
blockAll_cb.setTextColor(Color.RED);
CallBlocker =new BroadcastReceiver(){
@Override
public void onReceive(Context context, Intent intent) {                            
telephonyManager = TelephonyManager)context.getSystemService
(Context.TELEPHONY_SERVICE);
Class c = null;
try{
c = Class.forName(telephonyManager.getClass().getName());
}
catch (ClassNotFoundException e) {                                     
e.printStackTrace();
}
Method m = null;
try{
      m = c.getDeclaredMethod("getITelephony");
}
catch (SecurityException e)   {                                        
e.printStackTrace();
}
catch (NoSuchMethodException e) {                                
e.printStackTrace();
}
m.setAccessible(true);
try {
telephonyService = (ITelephony)m.invoke(telephonyManager);
}
catch (IllegalArgumentException e) {                             
e.printStackTrace();
}
catch (IllegalAccessException e) {                                     
e.printStackTrace();
}
catch (InvocationTargetException e) {                                        
e.printStackTrace();
}
telephonyManager.listen(callBlockListener, PhoneStateListener.LISTEN_CALL_STATE);
}
PhoneStateListener callBlockListener = new PhoneStateListener(){       
public void onCallStateChanged(int state, String incomingNumber){
if(state==TelephonyManager.CALL_STATE_RINGING){
if(blockAll_cb.isChecked()){
try{       
String s=t1.getEditableText().toString();
telephonyService.endCall();   Toast.makeText(getBaseContext(),    "Incoming Call No : "+incomingNumber,Toast.LENGTH_LONG).show();
String s1="Busy Now Call You Later";                      
if(s.length()>0){
SmsManager sms=SmsManager.getDefault();
sms.sendTextMessage(incomingNumber, null,  s, null, null);
}
else{
SmsManager sms=SmsManager.getDefault();
sms.sendTextMessage(incomingNumber, null,  s1, null, null);
}}
catch (RemoteException e) {                                                        
e.printStackTrace();
}}}}};};
IntentFilter filter= new IntentFilter("android.intent.action.PHONE_STATE");
registerReceiver(CallBlocker, filter);
}});}
public void initviews(){
blockAll_cb=(ToggleButton)findViewById(R.id.cbBlockAll);   
blockAll_cb.setTextColor(Color.RED);           
}
@Override
protected void onDestroy() {       
super.onDestroy();
if (CallBlocker != null){
unregisterReceiver(CallBlocker);
CallBlocker = null;
}}}


MyStartupIntentReceiver.java

package call.control;
import android.content.BroadcastReceiver;
import android.content.Context;
import android.content.Intent;
public class MyStartupIntentReceiver extends BroadcastReceiver
{
       @Override
     public void onReceive(Context context, Intent intent)
       {
             Intent i = new Intent(context, MainActivity.class); 
         i.addFlags(Intent.FLAG_ACTIVITY_NEW_TASK);
         context.startActivity(i); 
     }
}

3.     Create the  2 layouts

Main.xml


________________________________________________________________________________

<?xml version="1.0" encoding="utf-8"?>

<LinearLayout xmlns:android="http://schemas.android.com/apk/res/android"

    android:layout_width="fill_parent"

    android:layout_height="fill_parent"

    android:background="@drawable/frame"

    android:orientation="vertical"

    android:padding="20px" >

 <TextView        

        android:layout_width="wrap_content"

        android:layout_height="wrap_content"

        android:text=""

        android:textAppearance="?android:attr/textAppearanceMedium" />    

    <LinearLayout

        android:id="@+id/linearLayout1"

        android:layout_width="match_parent"

        android:layout_height="wrap_content"

        android:background="@drawable/frame"

        android:padding="20px" >

        <ToggleButton

            android:id="@+id/cbBlockAll"

            android:layout_width="wrap_content"

            android:layout_height="66dp"

            android:layout_weight="0.01"

            android:background="@drawable/frame"

            android:padding="16px"

            android:textOff="OFF"

            android:textOn="ON"

            android:textStyle="bold" >

        </ToggleButton>

        <TextView

            android:id="@+id/textView2"

            android:layout_width="20dp"

            android:layout_height="wrap_content"

            android:text=""

            android:textAppearance="?android:attr/textAppearanceSmall" />

        <TextView

            android:id="@+id/textView1"

            android:layout_width="wrap_content"

            android:layout_height="wrap_content"

            android:background="@drawable/frame"

            android:padding="16px"

            android:text="Block all Calls"

            android:textColor="#FF0000" />

    </LinearLayout>

    <TextView        

        android:layout_width="wrap_content"

        android:layout_height="wrap_content"

        android:text=""

        android:textAppearance="?android:attr/textAppearanceMedium" />

    <EditText

        android:id="@+id/T1"

        android:padding="16px" android:background="@drawable/frame"

        android:layout_width="match_parent"

        android:layout_height="wrap_content"

        android:layout_marginBottom="20dip"

        android:layout_marginTop="5dip"

        android:textColor="#ff0000"

        android:singleLine="true" >

    </EditText>

    <LinearLayout

        android:id="@+id/linearLayout2"

        android:layout_width="match_parent"

        android:layout_height="wrap_content"

        android:layout_weight="0.06"

        android:gravity="center"

        android:padding="20px" android:background="@drawable/frame" >

        <Button

            android:id="@+id/b1"

            android:layout_width="wrap_content"

            android:layout_height="wrap_content"

            android:layout_marginTop="10dip"

            android:background="@drawable/frame"

            android:padding="16px"

            android:text="Clear"

            android:textColor="#FF0000" >

        </Button>

        <TextView

            android:layout_width="wrap_content"

            android:layout_height="wrap_content"

            android:gravity="center"

            android:width="10px" />

        <Button

            android:id="@+id/b2"

            android:layout_width="wrap_content"

            android:layout_height="wrap_content"

            android:layout_marginTop="10dip"

            android:background="@drawable/frame"

            android:padding="16px"

            android:text="Exit"

            android:textColor="#FF0000" >

        </Button>

    </LinearLayout>

</LinearLayout>

_______________________________________________________________________


Frame.xml

<?xml version="1.0" encoding="utf-8"?>
<shape xmlns:android="http://schemas.android.com/apk/res/android">
  <gradient android:startColor="#AffF" android:endColor="#Ffff" android:angle="90" />
  <stroke android:color="#0000FF" android:width="2dip" />
  <corners android:radius="10px" />
</shape>

4.      Edit the android manifest file

Androidmanifest.xml


<?xml version="1.0" encoding="utf-8"?>
<manifest xmlns:android="http://schemas.android.com/apk/res/android"
      android:versionCode="1"
      android:versionName="1.0" package="call.control">
    <uses-permission android:name="android.permission.SEND_SMS"></uses-permission>
    <uses-permission android:name="android.permission.RECEIVE_BOOT_COMPLETED" />
    <application android:icon="@drawable/icon"                                 android:label="@string/app_name">
        <activity android:name=".MainActivity"
                  android:label="@string/app_name">
            <intent-filter>
                <action android:name="android.intent.action.MAIN" />
                <category android:name="android.intent.category.LAUNCHER" />
            </intent-filter>
        </activity>          
        <receiver android:enabled="true" android:name=".MyStartupIntentReceiver"
        android:permission="android.permission.RECEIVE_BOOT_COMPLETED">
        <intent-filter>
               <action android:name="android.intent.action.BOOT_COMPLETED" />
               <category android:name="android.intent.category.DEFAULT" />
        </intent-filter>
</receiver>
    </application>
    <uses-sdk android:minSdkVersion="3" />
      <uses-permission android:name="android.permission.READ_PHONE_STATE"/>
<uses-permission android:name="android.permission.MODIFY_PHONE_STATE"/>
<uses-permission android:name="android.permission.CALL_PHONE"/>
</manifest>


5.      Sample output


Mob    :       +91-9790766717
                   +91-9500087478
Web    :       www.masterychip.com
Mail     :       projects@masterychip.com


Wednesday, September 11, 2013

Porting Ubuntu 12.10 (quantal) on beagle board Xm Rev C

Installing Ubuntu 12.10(quantal) on beagle board Xm Rev C

     This post is about installing Ubuntu on a hardware box with embedded Linux. Below I am logging few steps how it was done. Overall, this effort is for me to learn how to set up an Ubuntu in beagle board xm
  • Hardware: 
    • Beagle Board xM (rev C)
    • micro SD card (4GB minimum but 8GB preferred) 
  • Software: Ubuntu Linux kernel 3.8.13   

This blog assumes that its reader has a good deal of knowledge about using and installing Linux software.
 Make sure that you are a root user..

You need to prepare a root file system in the Micro SD card, so you have to connect it to Linux host PC (Am using ubuntu 12.04).


sudo apt-get update

wget https://rcn-ee.net/deb/rootfs/quantal/ubuntu-12.10-console-armhf-2013-08-24.tar.xz

Verify image with:

md5sum ubuntu-12.10-console-armhf-2013-08-24.tar.xz 

the expected response is

1d8c4999592123fdd3a51864394ccb49 ubuntu-12.10-console-armhf-2013-08-24.tar.xz

Unpack image:

tar xJf ubuntu-12.10-console-armhf-2013-08-24.tar.xz

cd ubuntu-12.10-console-armhf-2013-08-24

Connect the micro SD card to host PC

sudo ./setup_sdcard.sh --mmc /dev/sdX --uboot beagle_xm

if you don’t know the sdvalue
sudo ./setup_sdcard.sh --probe-mmc
You should see something like
Are you sure? I don't see [/dev/idontknow], here is what I do see...

fdisk -l:
Disk /dev/sda: 500.1 GB, 500107862016 bytes <- x86 Root Drive
Disk /dev/sdd: 3957 MB, 3957325824 bytes <- MMC/SD card

lsblk:
NAME   MAJ:MIN RM   SIZE RO TYPE MOUNTPOINT
sda      8:0    0 465.8G  0 disk
├─sda1   8:1    0 446.9G  0 part /  <- x86 Root Partition
├─sda2   8:2    0     1K  0 part
└─sda5   8:5    0  18.9G  0 part [SWAP]
sdd      8:48   1   3.7G  0 disk
├─sdd1   8:49   1    64M  0 part
└─sdd2   8:50   1   3.6G  0 part

In this example, we can see via mount, /dev/sda1 is the x86 rootfs, therefore /dev/sdd is the other drive in the system, which is the MMC/SD card that was inserted and should be used by


 ./setup_sdcard.sh
Install image f or the Beagle Board xM:
sudo ./setup_sdcard.sh --mmc /dev/sdX --uboot beagle_xm
 After card preparation you can see the user name and password for that   kernel... and also you can see that SD card as two different drives and the      windows can detect only one in that... connect the SD card to beagle board xm.   You can  find the booting scripts of Ubuntu in UART (115200N81)or HDMI monitor if connected.
Default
Username: ubuntu
Password: temppwd


Mob    :       +91-9790766717
                   +91-9500087478
Web    :       www.masterychip.com
Mail     :       projects@masterychip.com

Thursday, September 5, 2013

FM Telephone (Wireless mic)

FM Transmitter
              A personal FM transmitter is a low-power FM radio transmitter which purpose is to allow music or other audio content from a portable media player, CD player or other portable audio system to be played through a nearby FM radio. It can either be a capability built into a portable media player, or a portable appliance that plugs into the headphone jack or proprietary output port of a portable media player or video device. The sound is then broadcast through the transmitter on an FM broadcast band frequency and picked up by the receiver. The purpose is generally to allow portable audio devices to make use of the better sound quality of a home audio system or car stereo without requiring a wired connection between them. Often called simply an FM transmitter, it is a low power device that should not be confused with high powered commercial FM broadcasting transmitters.


              Here is a simple transmitter that when connected to a phone line, will transmit anything on that line (except the dial tone) to any FM radio. The frequency can be tuned from 88 to about 94Mhz and the range is about 200 feet. It is extremely easy to build and is therefore a good, useful beginner project.


Parts

R1 180 Ohm 1/4 W Resistor
R2 12K 1/4 W Resistor
C1 330pF Capacitor
C2 12pF Capacitor
C3 471pF Capacitor
C4 22pF Capacitor
Q1 2SA933 Transistor
D1, D2, D3, D4 1SS119 Silicon Diode
D5 Red LED
S1 SPDT Switch
L1 Tuning Coil
MISC Wire, Circuit Board

Notes

1. L1 is 7 turns of 22 AWG wire wound on a 9/64 drill bit. You may need to experiment with the number of turns.
2. By stretching and compressing the coils of L1, you can change the frequency of the transmitter. The min frequency is about 88 Mhz, while the max frequency is around 94 Mhz.
3. The green wire from the phone line goes to IN1. The red wire from the phone line goes to IN2. The green wire from OUT1 goes to the phone(s), as well as the red wire from OUT2.
4. The antenna is a piece of thin (22 AWG) wire about 5 inches long.
5. All capacitors are rated for 250V or greater.
6. The transmitter is powered by the phone line and is on only when the phone is in use. S1 can be used to turn the transmitter off if it is not needed.
7. If you have problems with the LED burning out, then add a 300 ohm 1/4W resistor in series with it.


Mob    :       +91-9790766717
                   +91-9500087478
Web    :       www.masterychip.com
Mail     :       projects@masterychip.com

Followers

Disclaimer

The documents, software, tools and links are provided to enhance the ability of an electronics student, hobbyist or professional by sharing information. The information, links etc. should be used by the website visitor, at his or her own risk and responsibility. There may be concept, design and link errors in the pages.

My Creative Work, ideas and documents can be used for Product Design and Development by R&D Engineers, Hobbyists, Students and even firms for creating useful products. These cannot be used for reprint, replication or publishing online or offline.

Translate