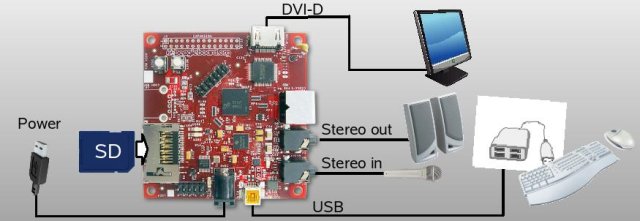
Porting ubuntu 13.10 on beagle board xm with GUI
Beagle board with GUI

Get prebuilt image:
wget https://rcn-ee.net/deb/rootfs/saucy/ubuntu-13.10-console-armhf-2013-11-15.tar.xz
Verify image with:
md5sum ubuntu-13.10-console-armhf-2013-11-15.tar.xz
8de42541ee3687d6a167878d4f873481 ubuntu-13.10-console-armhf-2013-11-15.tar.xz
Unpack image:
tar xJf ubuntu-13.10-console-armhf-2013-11-15.tar.xz
cd ubuntu-13.10-console-armhf-2013-11-15
If you don't know the location of your SD card:
sudo ./setup_sdcard.sh --probe-mmc
You should see something like
Are you sure? I don't see [/dev/idontknow], here is what I do see...
fdisk -l:
Disk /dev/sda: 500.1 GB, 500107862016 bytes <- x86 Root Drive
Disk /dev/sdd: 3957 MB, 3957325824 bytes <- MMC/SD card
lsblk:
NAME MAJ:MIN RM SIZE RO TYPE MOUNTPOINT
sda 8:0 0 465.8G 0 disk
├─sda1 8:1 0 446.9G 0 part / <- x86 Root Partition
├─sda2 8:2 0 1K 0 part
└─sda5 8:5 0 18.9G 0 part [SWAP]
sdd 8:48 1 3.7G 0 disk
├─sdd1 8:49 1 64M 0 part
└─sdd2 8:50 1 3.6G 0 part
In this example, we can see via mount, /dev/sda1 is the x86 rootfs, therefore /dev/sdd is the other drive in the system, which is the MMC/SD card that was inserted and should be used by ./setup_sdcard.sh...
1. install image:
2. Quick install script for "board"
3. sudo ./setup_sdcard.sh --mmc /dev/sdX --uboot beagle_xm
Quick install script for "board" (using new --dtb option)
sudo ./setup_sdcard.sh --mmc /dev/sdX --dtb dt-beagle-xm
You should now be able to unmount the SD card from you PC, insert into your Board, reboot and have the OS loaded.
For a basic framebuffer driven desktop environment: (make sure network is setup):
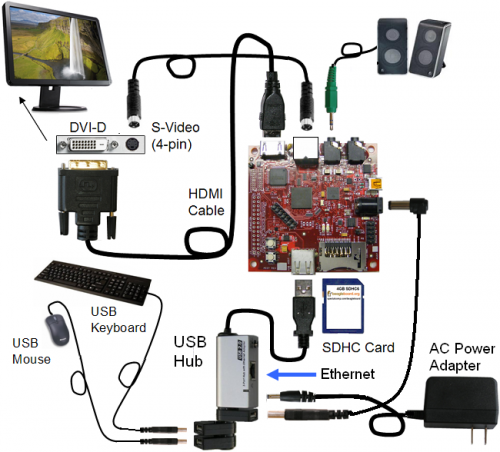
Ethernet: "sudo ifconfig -a" and "sudo dhclient usb1" or "sudo dhclient eth0"
Then run:
/bin/sh /boot/uboot/tools/ubuntu/small-lxde-desktop.sh
Select any one of GUI listed below as per your need,
sudo apt-get install ubuntu-desktop
sudo apt-get install xubuntu-desktop
sudo apt-get install lubuntu-desktop
sudo apt-get install kubuntu-desktop
sudo apt-get -y install lxde lxde-core lxde-icon-theme

Keep in mind that lxde is light weight and its most preferable....
for more project info visit,
www.masterychip.com
reference
http://elinux.org/Beagleboard:Installing_LXDE
http://elinux.org/BeagleBoardUbuntu
Get prebuilt image:
wget https://rcn-ee.net/deb/rootfs/saucy/ubuntu-13.10-console-armhf-2013-11-15.tar.xz
Verify image with:
md5sum ubuntu-13.10-console-armhf-2013-11-15.tar.xz
8de42541ee3687d6a167878d4f873481 ubuntu-13.10-console-armhf-2013-11-15.tar.xz
Unpack image:
tar xJf ubuntu-13.10-console-armhf-2013-11-15.tar.xz
cd ubuntu-13.10-console-armhf-2013-11-15
If you don't know the location of your SD card:
sudo ./setup_sdcard.sh --probe-mmc
You should see something like
Are you sure? I don't see [/dev/idontknow], here is what I do see...
fdisk -l:
Disk /dev/sda: 500.1 GB, 500107862016 bytes <- x86 Root Drive
Disk /dev/sdd: 3957 MB, 3957325824 bytes <- MMC/SD card
lsblk:
NAME MAJ:MIN RM SIZE RO TYPE MOUNTPOINT
sda 8:0 0 465.8G 0 disk
├─sda1 8:1 0 446.9G 0 part / <- x86 Root Partition
├─sda2 8:2 0 1K 0 part
└─sda5 8:5 0 18.9G 0 part [SWAP]
sdd 8:48 1 3.7G 0 disk
├─sdd1 8:49 1 64M 0 part
└─sdd2 8:50 1 3.6G 0 part
In this example, we can see via mount, /dev/sda1 is the x86 rootfs, therefore /dev/sdd is the other drive in the system, which is the MMC/SD card that was inserted and should be used by ./setup_sdcard.sh...
1. install image:
2. Quick install script for "board"
3. sudo ./setup_sdcard.sh --mmc /dev/sdX --uboot beagle_xm
Quick install script for "board" (using new --dtb option)
sudo ./setup_sdcard.sh --mmc /dev/sdX --dtb dt-beagle-xm
You should now be able to unmount the SD card from you PC, insert into your Board, reboot and have the OS loaded.
For a basic framebuffer driven desktop environment: (make sure network is setup):
Ethernet: "sudo ifconfig -a" and "sudo dhclient usb1" or "sudo dhclient eth0"
Then run:
/bin/sh /boot/uboot/tools/ubuntu/small-lxde-desktop.sh
Select any one of GUI listed below as per your need,
sudo apt-get install ubuntu-desktop
sudo apt-get install xubuntu-desktop
sudo apt-get install lubuntu-desktop
sudo apt-get install kubuntu-desktop
sudo apt-get -y install lxde lxde-core lxde-icon-theme

Keep in mind that lxde is light weight and its most preferable....
for more project info visit,
www.masterychip.com
reference
http://elinux.org/Beagleboard:Installing_LXDE
http://elinux.org/BeagleBoardUbuntu